Seedream 5.5 is ByteDance’s image-generation and editing model, now available in ChatCut, with upgrades to multi-turn editing, native transparency, realism and small text. ByteDance released it on November 9, 2026, and this guide walks through the upgrades and a ChatCut workflow from a starting image through four revisions to a video overlay. Official release announcement
Key Takeaways
- Feed each approved image into the next edit and compare the details you want to preserve.
- Check a transparent asset’s alpha channel and preview its edges over light and dark footage.
- Give the model exact menu or label copy, then proofread the result at its final viewing size.
- In ChatCut, generate the still, refine it and place the accepted asset in the same video project.
What’s new in Seedream 5.5?
1. More stable multi-turn editing
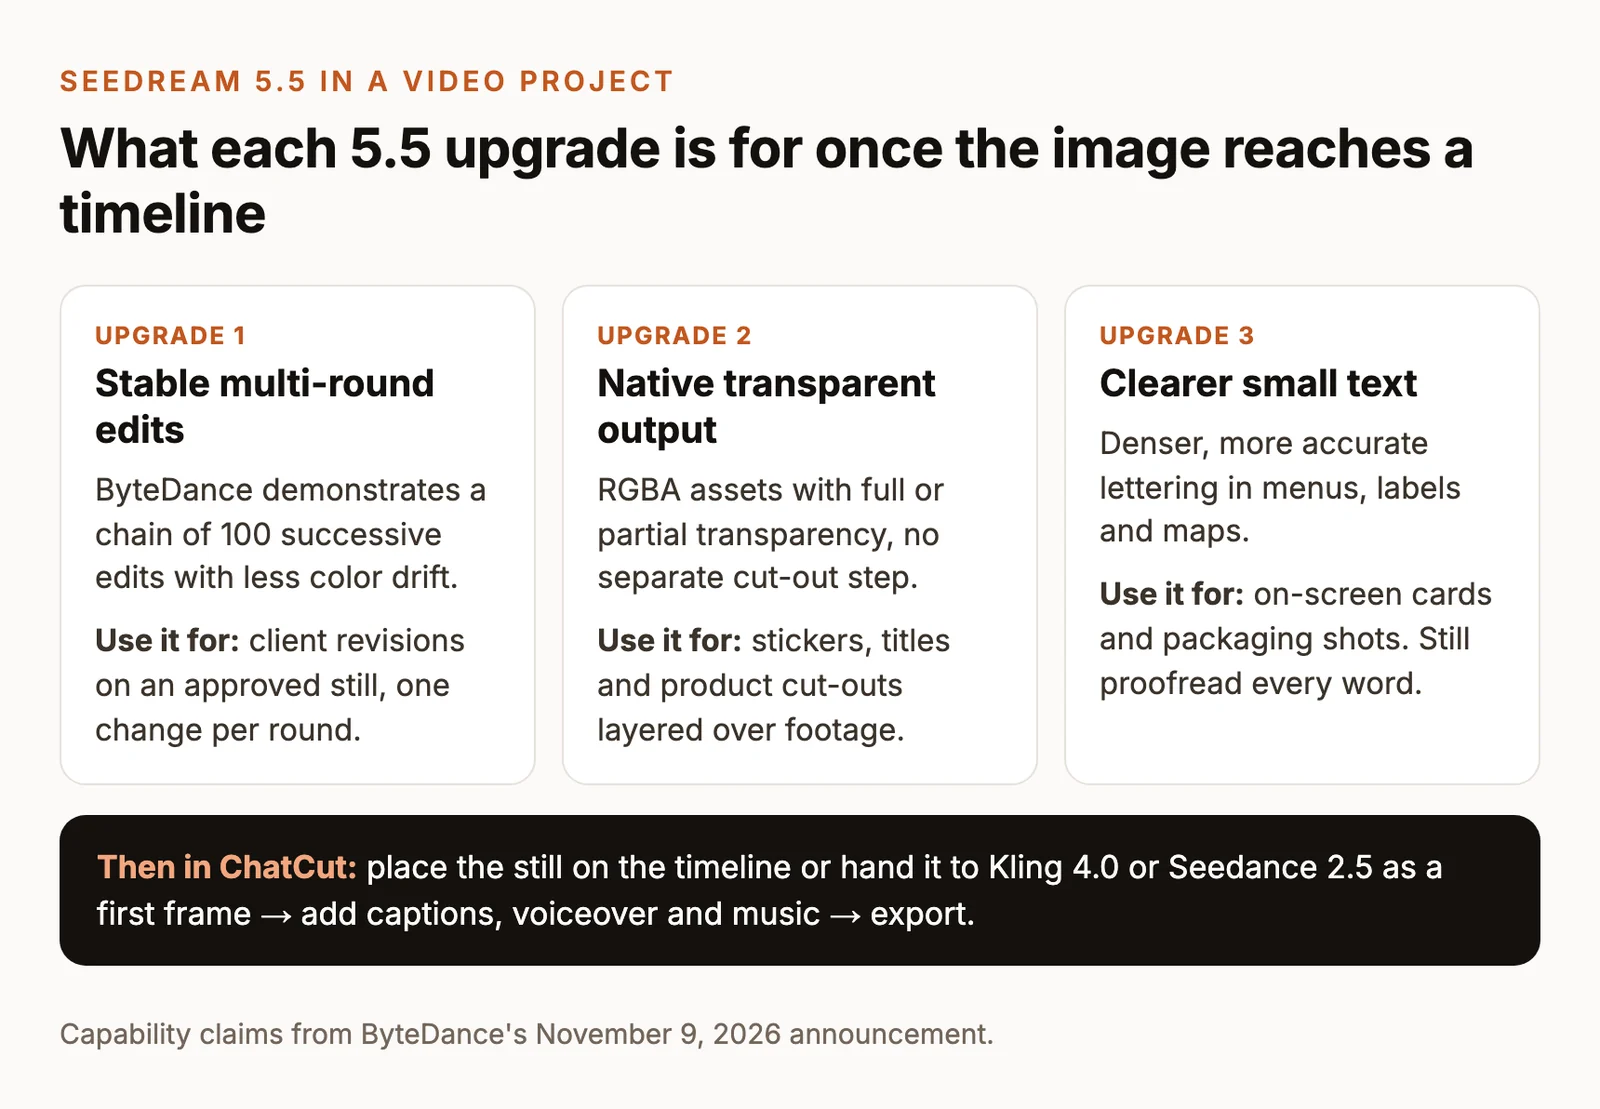
ByteDance demonstrates 100 successive edits, with each output becoming the next input, and describes improved preservation of areas outside the requested change. Its launch demonstration gives us a useful task to reproduce on a smaller scale. Official editing demonstration
Use the following exercise to check a product image through four revisions. Keep the endpoint and output settings fixed throughout. Compare each image with both its immediate input and the starting image, focusing on the mug’s silhouette, framing, shadow and reserved headline area.
The images below are prompt examples generated with GPT Image 2.6; they do not demonstrate Seedream 5.5 editing performance. Seedream 5.5 results will be added. For your own run, select Seedream 5.5 and check the available size, aspect ratio and credit estimate before generating, then keep those settings consistent across revisions.
Starting image · P01
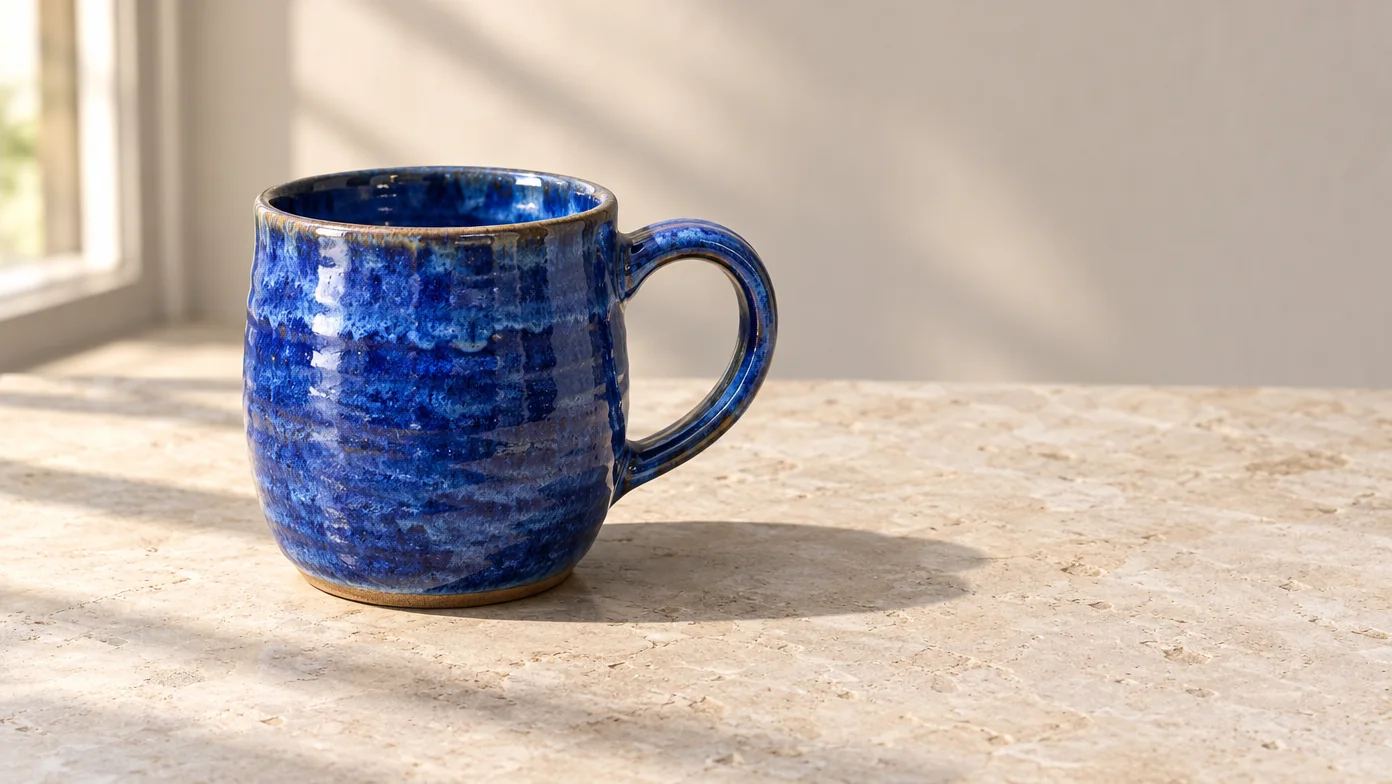
Inspect the mug’s rim, handle and contact shadow before accepting the starting image.
In this GPT Image 2.6 example, the blue mug has a complete right-facing handle, a bright highlight along the rim and a shadow extending across the open tabletop to the right.
Round 1 · Recolor the mug · P02
Use mug-base as the input.
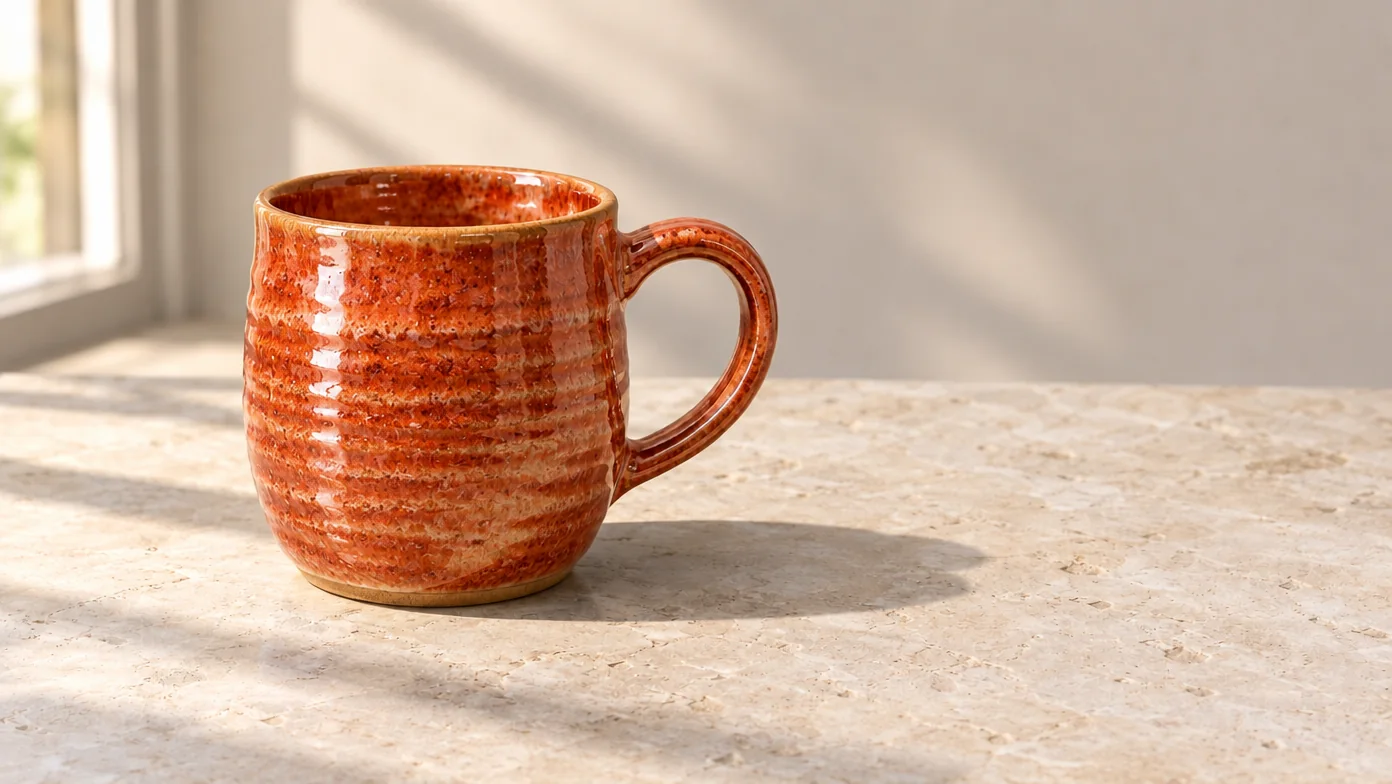
Compare the handle, crop and tabletop color with the starting image.
In this GPT Image 2.6 example, the glaze changes to orange terracotta while the right-facing handle, left-side window and broad rightward shadow remain in a similar composition.
Round 2 · Add a napkin · P03
Use mug-edit-01, the accepted output of round 1, as the input.
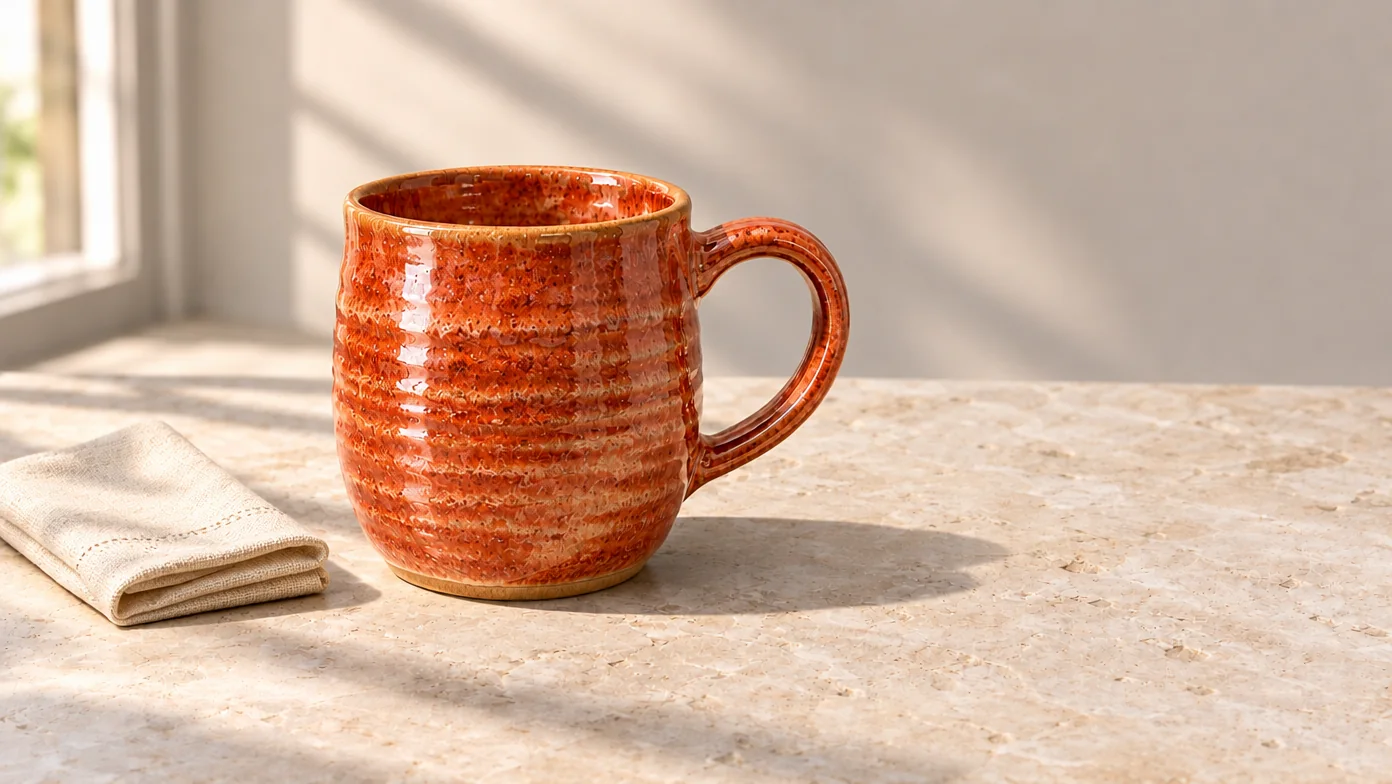
Check the napkin’s placement and the mug’s color, scale and position.
In this GPT Image 2.6 example, a folded cream napkin appears to the left with a visible gap, but the mug shifts right relative to the preceding image.
Round 3 · Add an olive twig · P04
Use mug-edit-02 as the input.
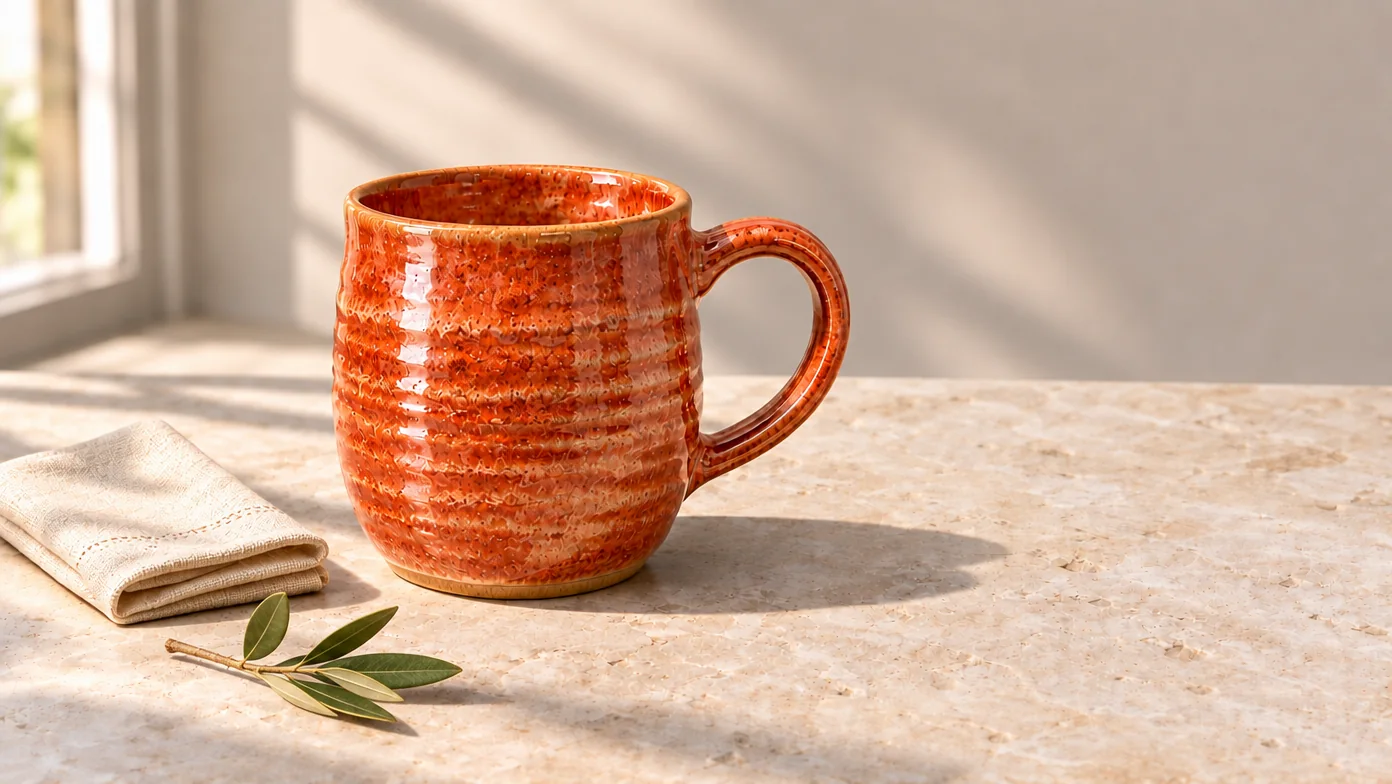
Inspect the twig’s contact with the table and compare the mug and napkin with round 2.
In this GPT Image 2.6 example, a leafy twig lies below the cream napkin in the lower-left foreground, separated from the mug and casting a small shadow on the tabletop.
Round 4 · Recolor the napkin · P05
Use mug-edit-03 as the input.
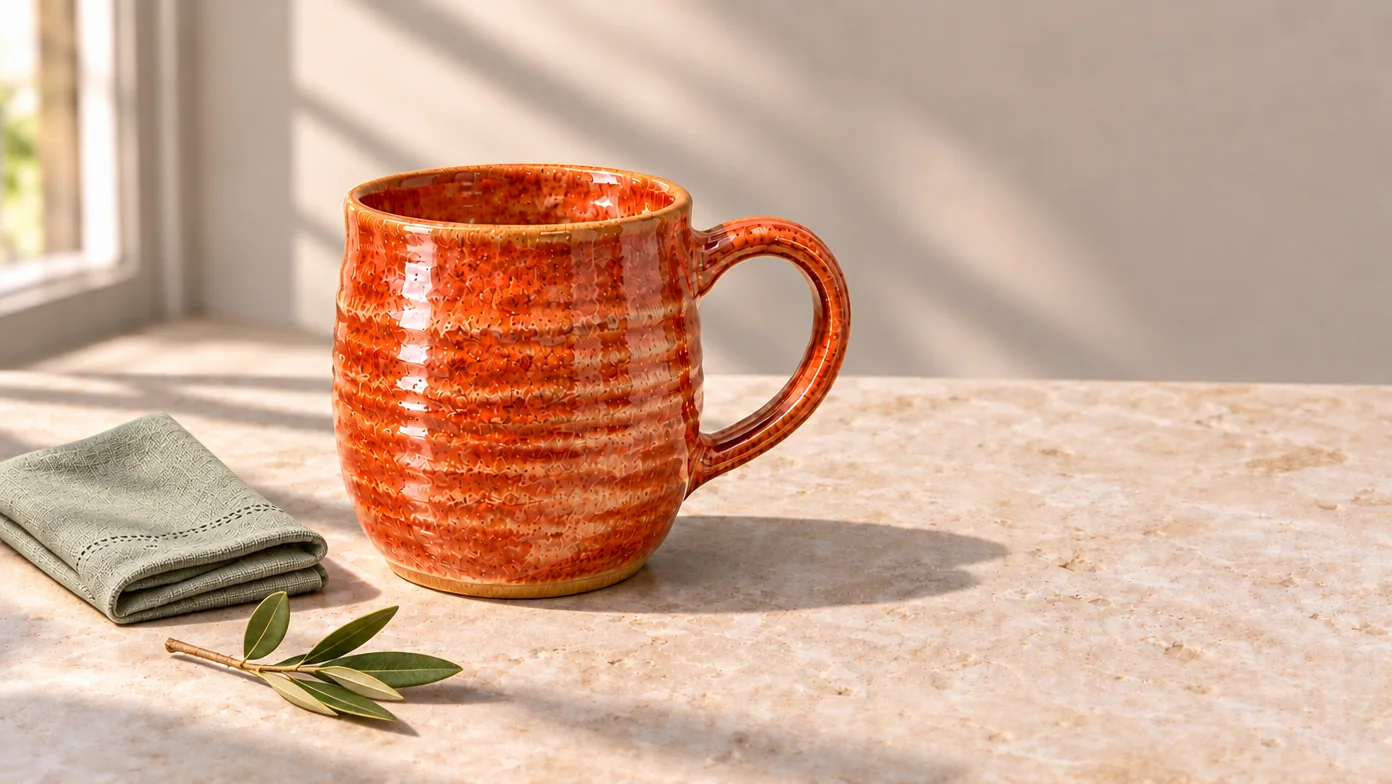
Compare the mug with the baseline and check whether the twig and napkin folds survived the final revision.
In this GPT Image 2.6 example, the napkin turns muted sage green while its folded layers and the foreground twig remain visible; the mug is still farther right than in the blue baseline.
For more starting briefs, use our Seedream 5.5 prompts.
2. Native transparent assets
Seedream 5.5 supports native RGBA generation, including full and partial transparency. An alpha channel lets footage show through around a sticker and through softer details such as steam. The official gallery includes cutouts and reusable graphic elements. Seedream 5.5 model showcase
For the video exercise, use P06 to request a separate mug sticker with a transparent background. Check the available background options before generating, then inspect the downloaded file’s format and alpha channel before using it as an overlay.

Place the file over a dark surface and a light surface. Inspect the steam, the handle opening and the outer paper edge, then use the accepted asset in step 3 below.
In this GPT Image 2.6 example, the orange mug and cream steam have a layered paper texture, but broad horizontal bands extend to the right of the steam and handle, so the preview does not establish a clean overlay.
3. More realistic images and clearer small text
The release also targets more natural lighting, materials and skin texture, along with clearer dense text and complex characters. Use the following briefs to inspect material detail, highlight transitions and exact copy. Official quality and text examples
Photographic detail · P07
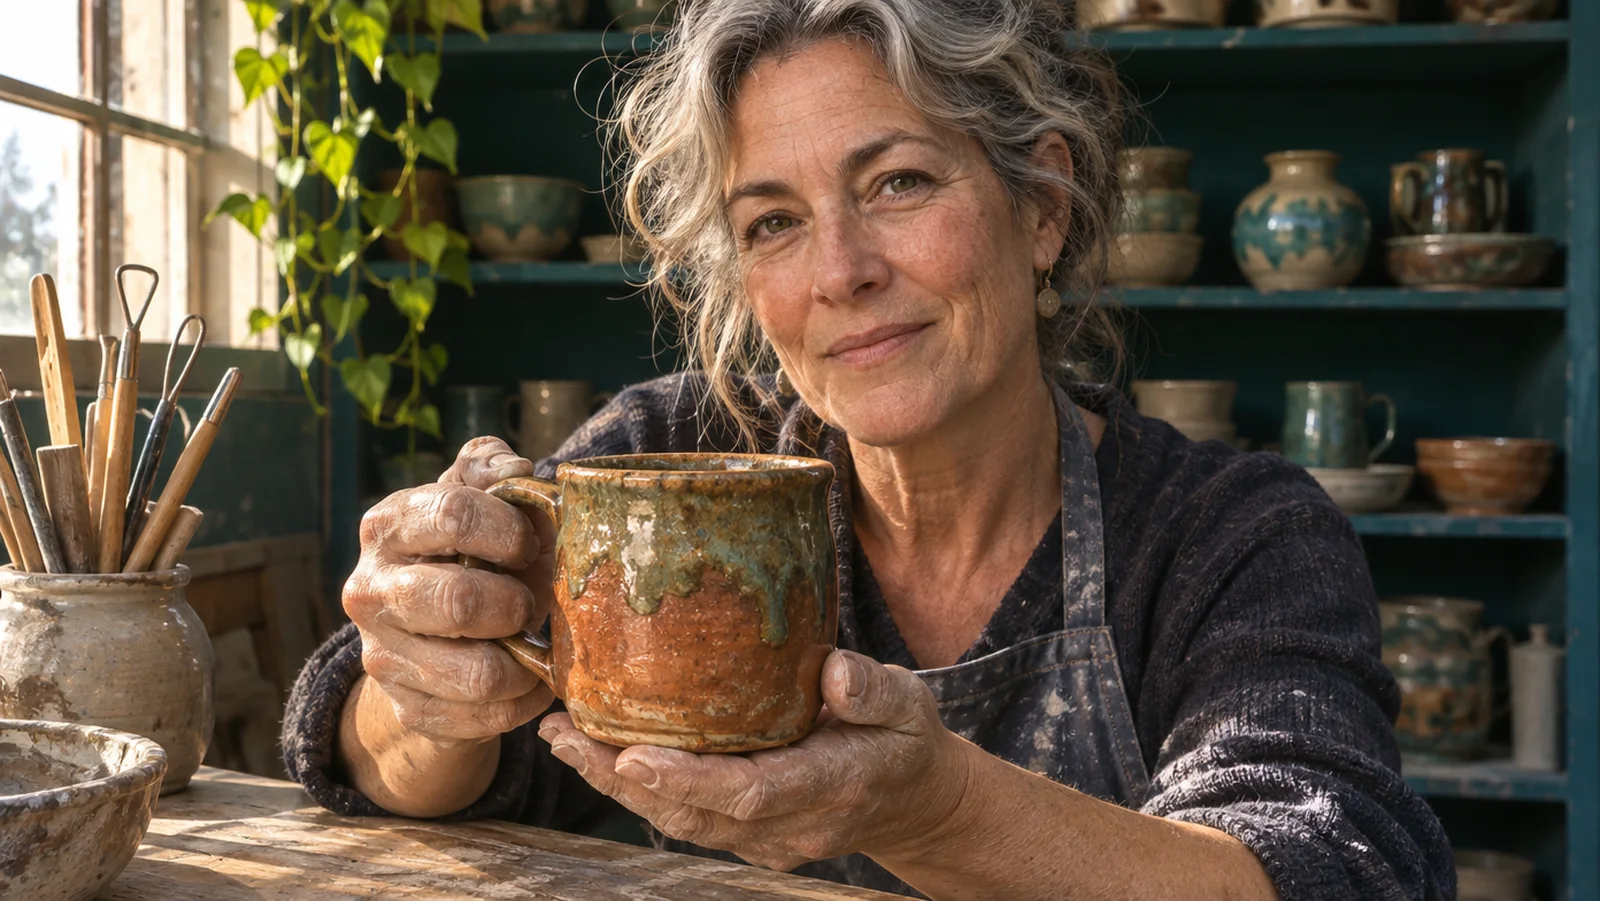
The artist’s face, clay-dusted fingers and mug put several materials under the same directional light. Inspect highlight transitions, hand anatomy and the boundary between skin and ceramic.
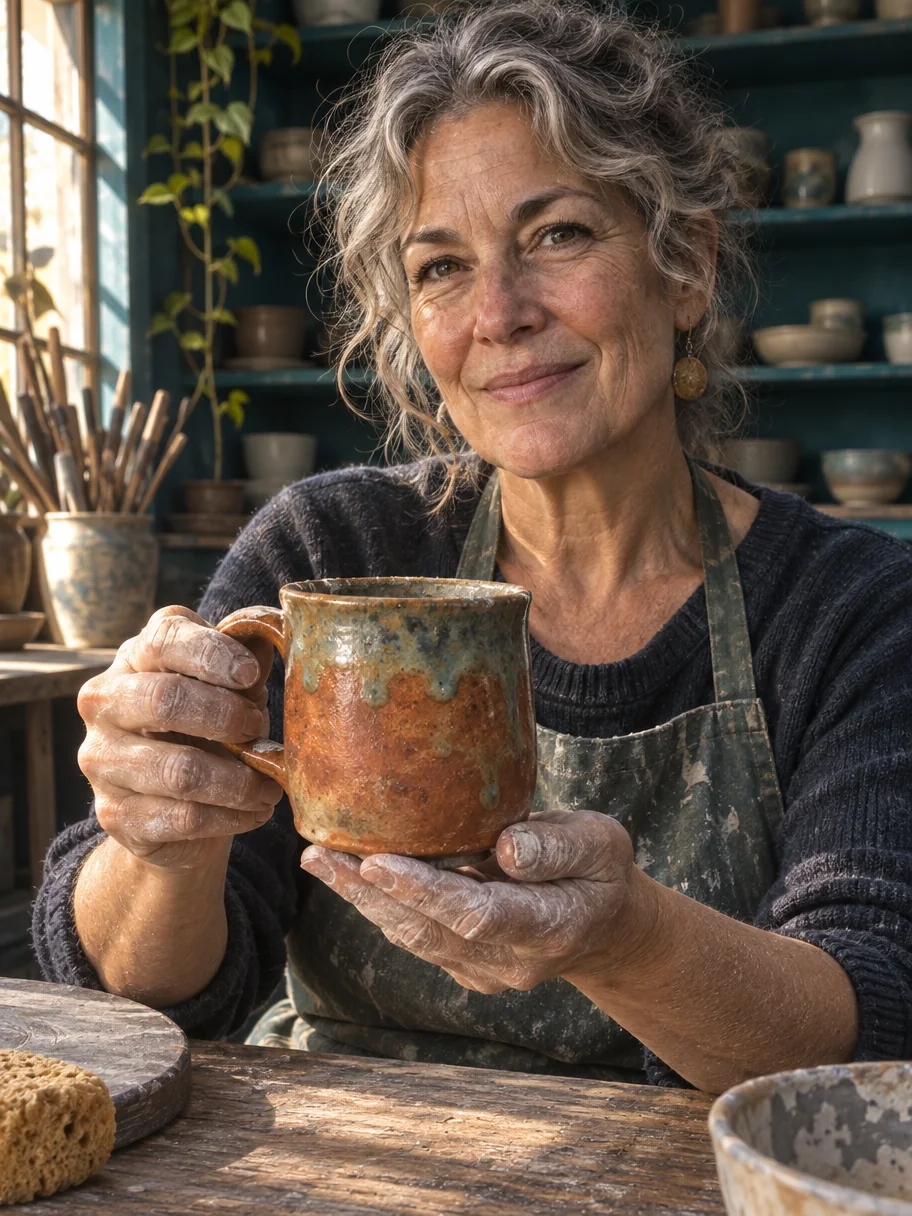
In this GPT Image 2.6 example, window light picks out facial lines, clay-dusted fingers and mottled glaze, with dark teal shelves behind the artist.
Small-text menu · P08
Use supplied copy so every line can be checked against the prompt. The menu is a fictional design exercise. Check the headline, section order, item descriptions and footer at full size, then preview the image at the size it will occupy in your video.
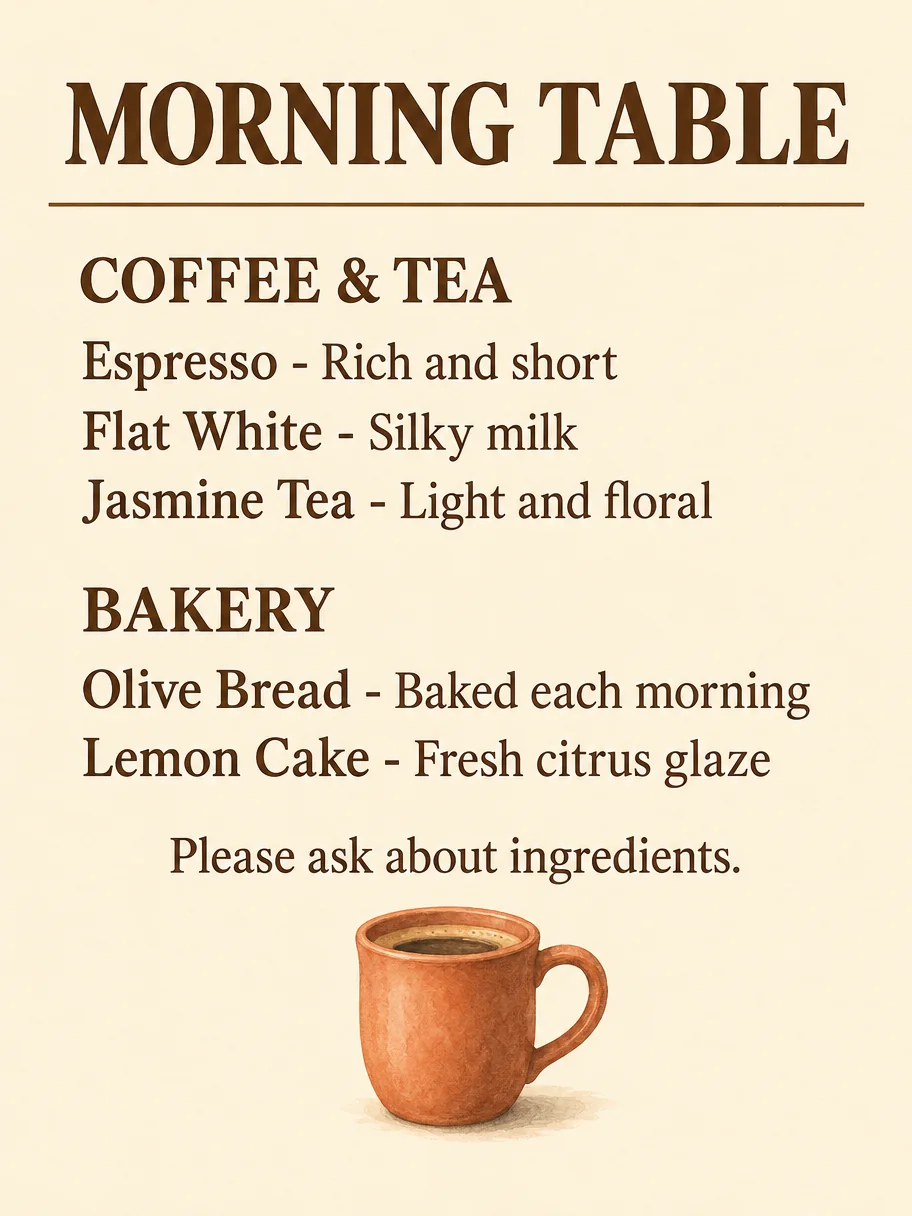
In this GPT Image 2.6 example, all nine supplied text lines are readable in the requested order, with left-aligned item names and a terracotta mug illustration below the footer.
Keep frequently revised wording, such as captions or promotional offers, in the editor’s text layers so you can update it directly.
Seedream 5.5 vs 5.0 Pro at a glance
Seedream 5.0 Pro already offered localized editing, dense layouts, multilingual text and layer separation with transparent layers. The table summarizes how the newer release develops those capabilities. 5.0 Pro announcement, 5.5 announcement
| Area | Seedream 5.0 Pro | Seedream 5.5 | What to check in your project |
|---|---|---|---|
| Repeated revisions | Position-aware, localized edits | Greater emphasis on stability through successive edits | Compare framing, color and untouched details after each revision |
| Transparent assets | Layer separation with transparent outputs | Native RGBA generation of standalone assets | Inspect the delivered alpha channel and soft edges |
| Text and layouts | Dense information design and multilingual text | Refinements to small text and complex character shapes | Proofread every supplied line at delivery size |
| Photographic detail | Realistic lighting, materials and portraits | Further refinement of texture and highlight rendering | Inspect skin, fabric, ceramics and shadows |
For an output comparison, use identical prompts, reference files, output dimensions and matching settings, then review the originals side by side. The connected exercise above specifies a single-model revision chain. Our Seedream 5.5 vs Seedream 5.0 Pro guide covers the version comparison in more detail, and the Seedream model guide explains the family.
How to use Seedream 5.5 in ChatCut
1. Generate the starting image
Open a ChatCut project and ask the Agent to generate an image using Seedream 5.5. Use P01 for the mug exercise. If the image needs to match an existing product, attach its reference through + or reference a project asset with @. Generated images are saved in My Assets. ChatCut image-generation guide
Pick Seedream 5.5 in the model menu and review the available settings and credit estimate before you generate.
| Setting to check | Seedream 5.5 in ChatCut |
|---|---|
| Output size | Choose from the sizes shown for the selected model; check the delivered image dimensions after generation |
| Aspect ratio | Choose an available ratio that fits your composition and keep it consistent across edits |
| Background and file | Check the available background controls; inspect the downloaded format and alpha channel if you need transparency |
| Reference image | Attach the latest approved image as the reference for the next edit and review the request before sending |
| Access and credits | Check the access options shown for your account and the current credit estimate for each generation or edit |
Review the request’s credit estimate before sending. After completion, open Credits history → Detail for the actual charge. ChatCut generation credits
2. Edit the latest approved result
Reference the accepted P01 result and run P02. Continue with P03, P04 and P05, attaching the immediately preceding accepted output each time. Save the versions you approve so you can return to an earlier point when a change needs another attempt. The general reference-and-revise workflow is documented in ChatCut’s image guide. Image generation and revisions
After each round, compare your result with its input and the baseline before feeding it forward. Keep a short record of each prompt and its input and output filenames or asset identifiers. Retain every approved version so you can attach an earlier image if a later edit drifts.
3. Layer a transparent asset into your video
Use P06 to request a transparent asset, check the available background controls before generating, then inspect the returned file’s alpha channel. Put your footage on V1 and drag the accepted sticker from My Assets onto V2 above it. Adjust the sticker’s scale, position and duration, leaving room for the subject and captions. Preview across moving footage, export, and open the exported file to check its edges. How to add an image to a video
For an end-to-end transparency check, confirm that the downloaded source has an alpha channel, preview the imported asset over both light and dark footage, then inspect the exported video for halos, solid backgrounds and damaged edges. The example above has visible edge artifacts; use only an asset that passes these checks.
You can also use the accepted campaign still as a first frame for a new moving shot. In Video Gen, choose a supported frame-input mode, add the still and describe the camera or subject movement, then bring the returned clip onto the timeline. Continue with captions, voiceover and music in the project. Supported model choices include Kling 4.0 and Seedance 2.5. Follow the image-to-video workflow and AI video prompts guide for motion briefs.
Seedream 5.5 limitations and checks
| Check | Practical action |
|---|---|
| Revision drift | Compare each new output with its input and baseline, including details outside the requested edit |
| Transparency delivery | Inspect the downloaded alpha channel, then the overlay in the exported video |
| Text accuracy | Proofread wording and layout at the final viewing size, including small captions |
| Output settings | Confirm the selected endpoint’s controls and inspect the delivered pixel dimensions |
| Credits and retries | Check the estimate for each generation or edit, then the completed transaction |
| Motion consistency | Review the generated video’s moving edges, object identity and final frame as a separate production step |
ByteDance’s long editing demonstration and internal evaluations give useful starting questions for your own tests. For production decisions, judge your actual outputs against the brief and record the settings used. Official release and evaluations
If your project already uses GPT Image 2.6, include the same brief when choosing an image model. ChatCut positions Flare for everyday drafts and Sunburst for precise edits and dense layouts. See the GPT Image 2.6 model page and our Seedream, Nano Banana and GPT Image comparison.